Assign Advanced Set Rights
This topic provides an overview of the options available in an employee's Advanced Set Rights Set Rights are the system permissions you allocate to employees to control the information available to a user about other employees.. Before selecting these checkboxes in an employee's record for the first time, we recommend creating a Test User. This way you can check whether you have chosen the correct permissions.
In this section:
Set Rights Roles
Do you have Set Rights Roles included in your package? If so, you can save time by creating a generic role with Set Rights permissions and assigning it to multiple employees.
For example, consider creating an Employee role with Set Rights permissions that apply to all standard employees in your company. Then, use the Employee Selector to assign this role to them. This way, you won't have to update employees' Set Rights individually in their records.
If you do not have Set Rights Roles included in your package, follow the steps listed in this topic.
Access an employee's Set Rights
-
Sign in to Staffology HR.
-
In the navigation menu, select Directories.
-
In the Employees tab or any other tab, search for the required employee and select their record.
-
Select Edit on the required employee's record and choose the Personal tab.
You can also select the Edit icon displayed on the employee's name:

-
Choose Actions > Set Rights.
-
At the bottom of the screen, select Advanced.
A screen showing the employee's Self Rights, Team Rights and Secondary Rights opens.
Here is a summary of the Set Rights levels:
Level Controls employees' access to... This refers to the information employees can update in their My Details tabs.
Team Rights Mostly used for line managers and system administrators and provides access to other employees' information.
Access to other employees’ information is controlled by Where Clauses.
Secondary Rights Gives an employee access to additional information not covered by Team Rights.
For any item (tab), you can select from the following access options:
-
View
-
Create
-
Modify
-
Delete
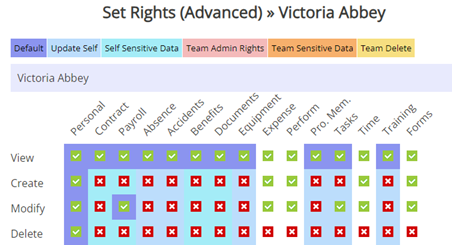
Update Self Rights
An employee’s Self Rightsrelates to the access they have to their own information in My Details.
Select each checkbox as required to give the employee access to the system area.
-
The key features of this screen include:
-
A tick displays for each tab/function the employee can access.
If you do not select View on the tab, the employee cannot open it.
-
A cross displays for each tab/function the employee cannot access.
-
The colour-coded tabs at the top of the screen (Default, Update Self, Self Sensitive Data etc) correspond to the options at the top of the main/basic Set Rights screen.
-
The default (purple) items show the employee’s basic access to the system.
-
We advise giving employees Delete permissions for their personal information only. This is to prevent employees deleting important information from other My Details tabs.
To ensure admins receive a notification if an employee updates their information in the Personal, Contract or Payroll tabs, add a notification email. Refer toAdd Notification Email addresses in System Configuration for guidance on how to set this up.
Giving an employee Create and Delete permissions for their Personal tab allows them to add and delete key contacts. Employees can access the Key Contacts option from My Details > Personal > Actions, Key Contacts.
-
Granting permission to Modify the Payroll tab allows the employee to update only their bank account and passport details.
-
Select a row or column label to toggle all permissions for that row or column on or off. Alternatively, switch items on or off individually.
-
Select Save to save your changes or if the employee has direct reports, choose Team Rights and subsequently Secondary Rights.
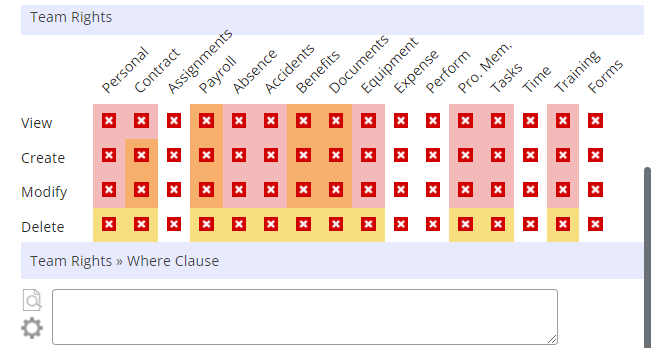
Team Rights - Standard Employee
The checkboxes within Team Rights are typically not applicable for standard employees because selecting these checkboxes grants access to other employees' information.
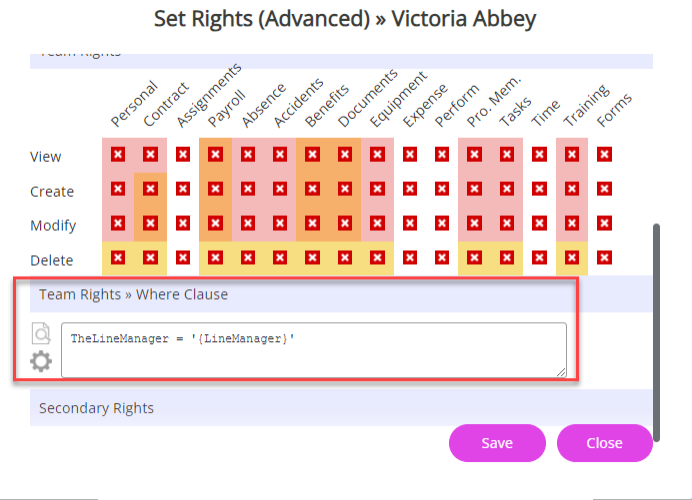
Instead, you can use a Team Rights > Where Clause Allows you filter records using a specific criteria. within the Team Rights section to enable employees to view non-sensitive absence When an employee or worker is absent from work. This can be for a variety of reasons. information in the Group Absence Calendar for employees within their team or company.
If you do not select any of the checkboxes but add a Team Where Clause, the employee will have read-only access to the Group Absence Calendar for all employees covered by the Team Where Clause. The Team Rights > Where Clause in this section syncs with the Team Where Clause on the first Set Rights screen.
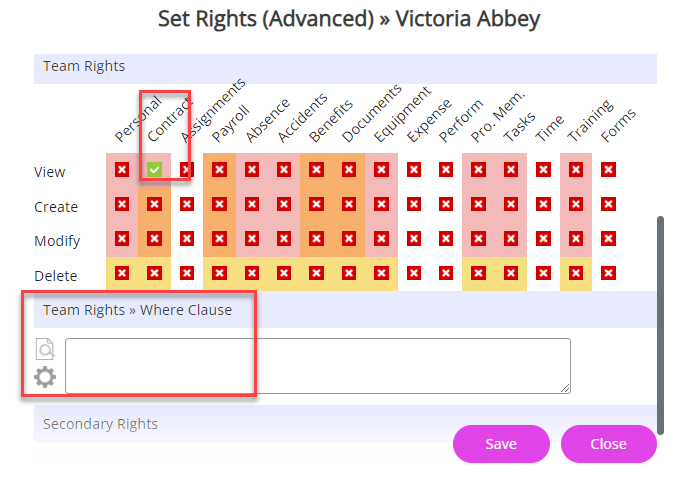
If you do need to configure Team Rights for a standard employee, the following conditions apply:
-
If no indicators are ticked within Team Rights and there is no Team Rights Where Clause in place, the employee has no access to any other employees.
-
If you select a checkbox within the Team Rights but no Team Where Clause is in place, the employee has access to information for that indicator for all employees.
Team Rights - Line Manager
-
When no checkboxes are selected, and there is no Team Where Clause in place, the line manager cannot access other employees' information in the My Details tabs.
-
Selecting a checkbox within an employee's Team Rights but without adding a Team Where Clause means that the employee can access information for the selected indicator for all employees. (They will also see these employees in the Group Absence Calendar.)
-
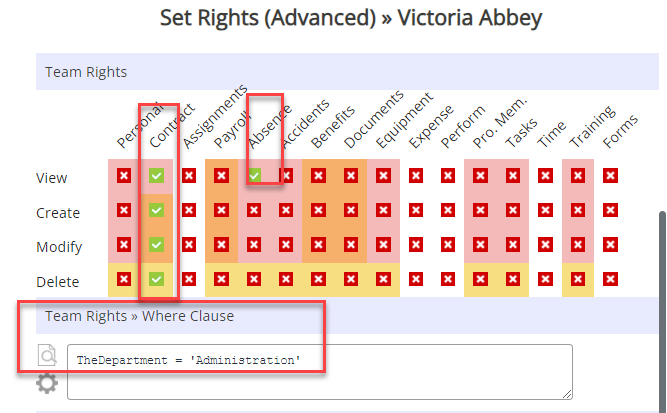
Selecting a checkbox within Team Rights with a Team Where Clause in place means the employee can access information for that checkbox for the employees included in the clause.
They can also view all employees covered by the Team Where Clause in the Group Absence Calendar, provided you have selected the View checkbox within the Absence column. If the View checkbox is not selected, the line manager cannot access the Group Absence Calendar.
-
When no indicators are selected, but a Team Where Clause is in place, the employee has read-only access to the Group Absence Calendar for all employees covered by the Team Where Clause.
Secondary Rights
-
Secondary Rights apply when a user requires access permissions beyond their Team Set Rights.
For instance, heads of departments may need one set of permissions to manage their direct reports and another set to view certain information only for their entire department.
Examples of employees needing Secondary Set Right access include:
-
A Health and Safety officer requiring access to the Accidents tab for all employees so that they can view details of workplace accidents.
-
A head of IT needing access to the Equipment tab for all employees so that they can view, create, modify, and delete equipment records.
-
-
Secondary Rights generally do not apply to standard employees.
Team Rights override Secondary Rights, so if an employee needs access to information about other employees under Secondary Rights, you must also select the same checkboxes in the employee's Team Rights.
Secondary Rights tips
When setting up Secondary Rights, ensure to:
-
Allow the employee access to their information by configuring their Self Set Rights.
-
Configure their Team Set Rights to grant them access to the direct reports for employees they manage. Remember to select the same checkboxes you select in Secondary Rights in the employee's Team Rights.
Add Secondary Rights in an employee's record
Self Rights
-
In the employee's Self Set Rights, select the relevant checkboxes based on their permission requirements.
Team Rights
-
Determine whether this employee manages a team with direct reports and requires access to sensitive information about those reports.
-
If they manage a team and need access, configure this employee's access to direct report information for their team and then go to Step 4, then Step 5.
-
If they do not require access to any other employee's record, go to Step 3, then Step 5.
Step 3: Team Rights Configuration (for Employees without Direct Reports)
-
-
If the employee does not have any direct reports,
-
Configure their access to specific tabs using Team Rights instead of Secondary Rights.
-
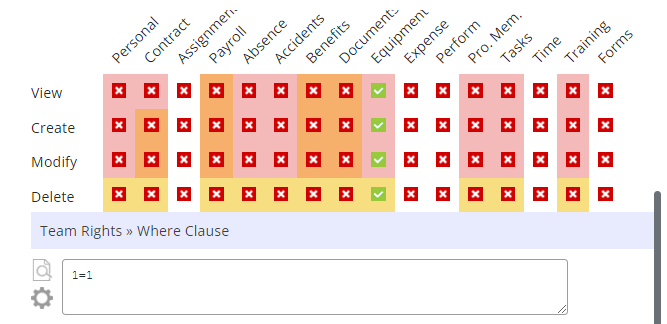
Example: The Head of IT does not have direct reports but is responsible for keeping equipment up to date for everyone in the company. In this case, you would select the View, Create, Modify, and Delete checkboxes under the Equipment column in Team Rights and add 1=1 in the Team Rights > Where Clause to give them access to this tab for everyone in the company.
Step 4: Secondary Rights Configuration (for employees with Direct Reports)
-
-
If the employee manages a team with direct reports:
-
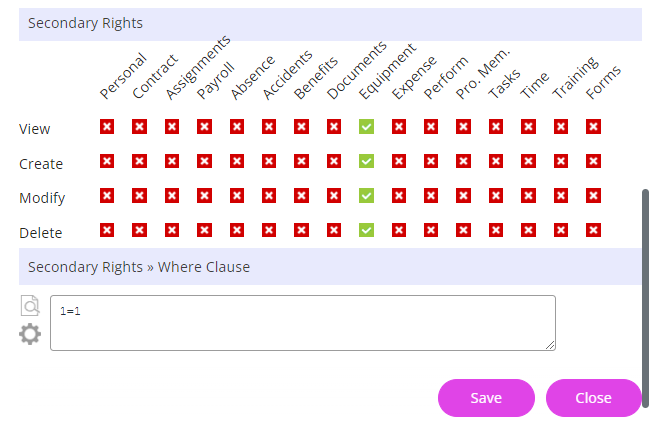
In Secondary Rights, configure the employee's access to information about all other employees by selecting the View, Create, Modify, and Delete checkboxes in the columns for the relevant tabs you want to grant access.
Example: The Head of IT has direct reports but also requires full access to the Equipment tab for everyone in the company.
In this case, you would select View, Create, Modify, and Delete in the Equipment column and leave everything else deselected.
Remember, Team Rights override Secondary Rights, so choose the same checkboxes selected in Secondary Rights in Team Rights.
-
Set the Where Clause as 1=1 to ensure the access applies to the whole organisation.
1=1 is a technical term and means that the statement equals true.
-
Step 5: Save Changes
-
-
The employee should now have access to the required tabs for either a select or all employees in your company (depending on the checkboxes chosen).