Create a fixed or non-fixed work pattern
-
Sign in to Staffology HR.
-
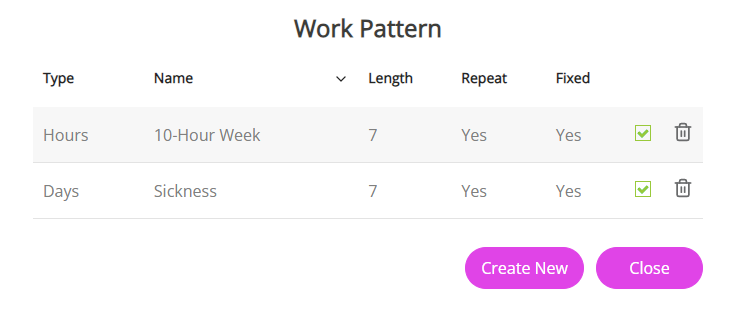
Go to System Tools > Lookup Tables > Contract and select Work Pattern.
-
To add a new pattern, select Create New.
-
A form displays.
The information entered here changes depending on whether you want to create a Fixed or Non-Fixed Pattern.
Choose an option:
-
Create a Fixed 7-Day Work Pattern - use this option if your Work Pattern does not change and follows the same 7-day pattern.
-
Create a non-Fixed Work Pattern - use this option if your Work Pattern length is longer than the standard 7-day week. For example, your company may follow a 14-day Work Pattern.
-
Create a Fixed (7-Day) Work Pattern
-
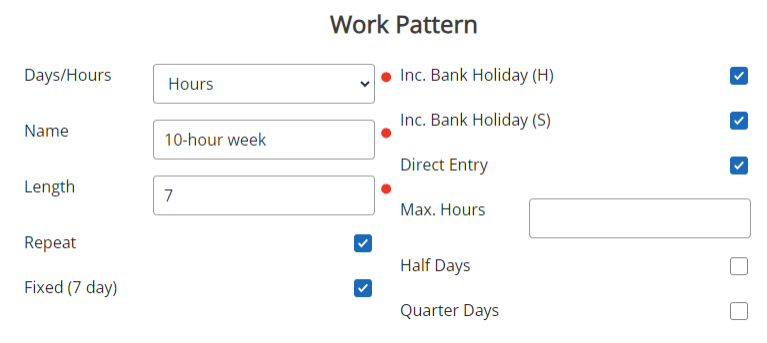
From the Days/Hours dropdown, choose either Days or Hours for your work pattern.
-
Enter a Name for your work pattern. For example, "10-hour week" or "Monday - Thursday".
-
Enter the number of days the Work Pattern covers in the Length field.
-
Repeat sets as default. Keep this indicator selected if you want the work pattern to start again once it has reached the first day.
-
Fixed (7 Day) sets a default. If your work pattern does not change after week 1, leave this selected.
If your Work Pattern is longer than 7 days, deselect this checkbox and enter the Work Pattern duration in the Length field. For example, 8 or 14. This signifies the Work Pattern number of days.
-
Inc. Bank Holiday A bank holiday is a public holiday recognised nationwide in the United Kingdom and the Crown dependencies. (H) & (S). These checkboxes allow you to choose whether the Work Pattern should count Bank Holidays (public holidays) as working days.
(H) is for Holiday, (S) is for Sickness (in case you have different rules for each).
-
Do not select this checkbox if you want to deduct Bank Holidays from the employee's Holiday Entitlement.
-
Select this checkbox if you do not want to deduct Bank Holidays from the employee's Holiday Entitlement.
The same logic applies to sickness.
-
-
-
Direct Entry For employees who do not work the conventional full-time, permanent working hours (Monday-Friday, fixed-hour arrangement). When enabled in the system, it allows employees to add an absence in hours or days. only applies if you have activated this field in System Tools > Tools > System Configuration > Work Patterns (Direct Entry) For employees who do not work the conventional full-time, permanent working hours (Monday-Friday, fixed-hour arrangement). When enabled in the system, it allows employees to add an absence in hours or days..
Select this option if you have employees who do not work the standard Monday-Friday, fixed-hours Work Pattern. Further Direct Entry guidance.
-
If required, add a maximum number of hours per day using the Max Hours option.
-
Half Days: You can manage the work pattern in increments of half days.
-
Quarter Days: You can manage the work pattern in increments of quarter days.
Holiday and Sickness tables
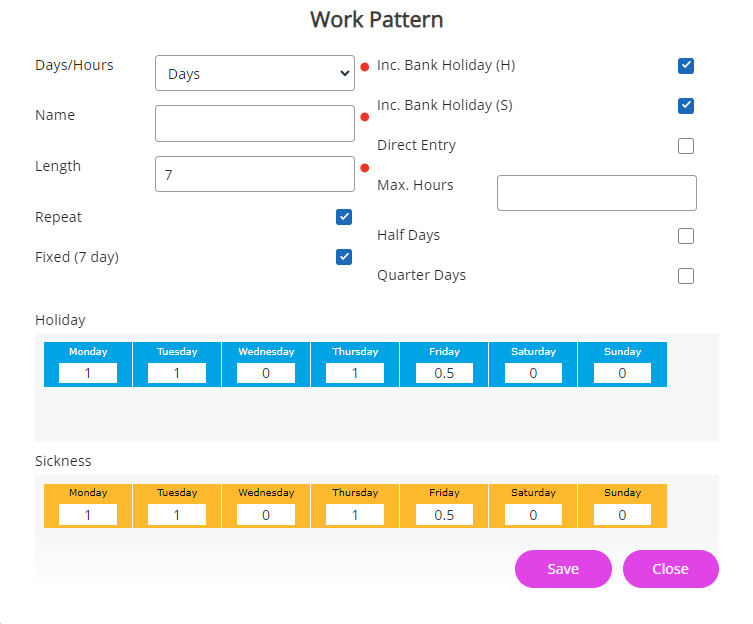
Days Pattern
-
If you are creating a Days Based pattern, in the Holiday section, enter the proportion employees are to work each day.
For example, add the number 1 in the relevant column to signify a full working day or 0.5 to signify half-a-day.
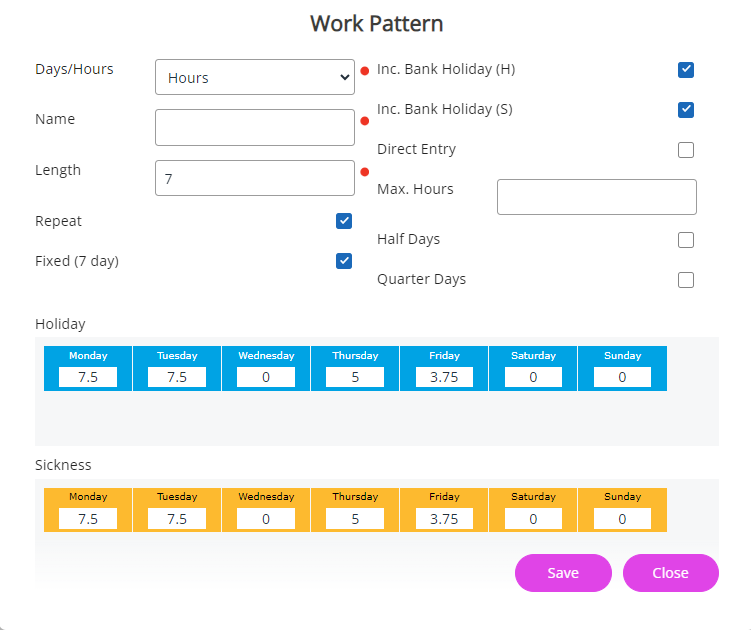
Hours Pattern
For an Hours-based pattern, in the Holiday section, enter the number of hours employees are to work each day.
For example, in the Monday and Tuesday columns, you may enter 7.5. In the Thursday column, you may enter 5, and in the Friday column, you may enter 3.75. These values signify the number of hours employees work each day.
For hours-based patterns, remember to assign the Work Pattern in an employee's My Details > Contract tab, and amend the holiday entitlement into hours (if this was previously days). These fields do not link automatically.
-
After adding the values in the Holiday section, the Sickness section populates.
-
Select Save to create the Work pattern.
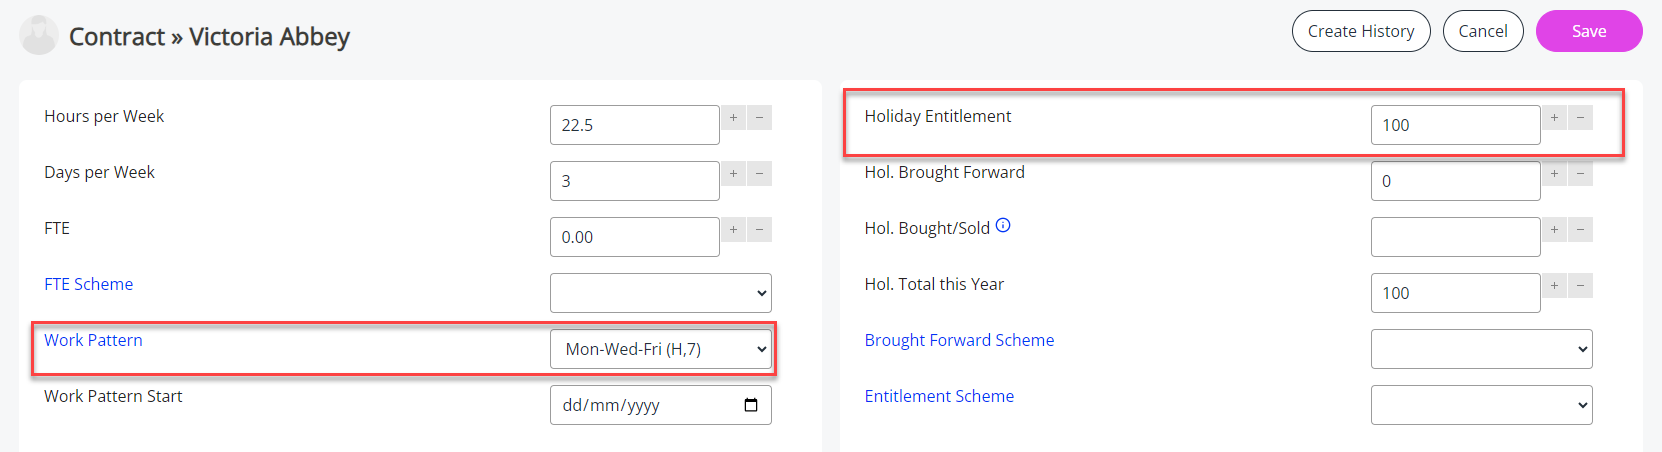
Learn how to Assign a Work Pattern to an employee
Create a non-fixed Work Pattern
-
From the Days/Hours dropdown, choose either Days or Hours for your work pattern.
-
Enter a Name for your work pattern. For example, "4 on 4 off".
-
Add the number of days you wish the pattern to cover in the Length field.
This adds the additional days to the pattern.
-
Repeat sets as default. Keep this indicator selected if you want the work pattern to start again once it has reached the first day.
-
Deselect the Fixed (7 Day) indicator if your Work Pattern length is over the standard week.
- Inc. Bank Holiday (H) & (S). These checkboxes allow you to choose whether the Work Pattern should count Bank Holidays (public holidays) as working days.
(H) is for Holiday, (S) is for Sickness (in case you have different rules for each).
Do not select this checkbox if you want to deduct Bank Holidays from the employee's Holiday Entitlement.
Select this checkbox if you do not want to deduct Bank Holidays from the employee's Holiday Entitlement.
The same logic applies to sickness.

-
Select Save to create the Work Pattern.
Learn how to Assign a Work Pattern to an employee
Using Direct Entry
Enabling the Direct Entryfeature permits employees on zero-hour contracts or flexible work patterns to Request an Absence When an employee or worker is absent from work. This can be for a variety of reasons. in hours/days. They can also add aSelf Cert Sickness (providing you have enabled this feature in System Tools > Utilities > Tools > System Configuration and selected the Self Cert. Sick checkbox).
-
Add the details for the Work Pattern as described in the creating a fixed 7-day Work Pattern steps.
-
Select the Direct Entry checkbox.

-
Select Save to create your Work Pattern and make it active.
-
Now, when an employee requests an absence, they can add the number of hours/choose the days affected by the absence in the Work Pattern calendar.

Related topics:
Assign a Work Pattern to an employee
Add an employee absence such as sickness or edit an absence duration