Create a Set Rights Role for line managers
Screenshots are taken from a test system and may not match your system exactly.
Watch a video tutorial on how to create a Set Rights Set Rights are the system permissions you allocate to employees to control the information available to a user about other employees. Role for line managers.
-
Sign in to Staffology HR.
-
Go to System Tools > Utilities > Company > Set Rights Roles.
-
Select Create New to open the Set Rights screen.
-
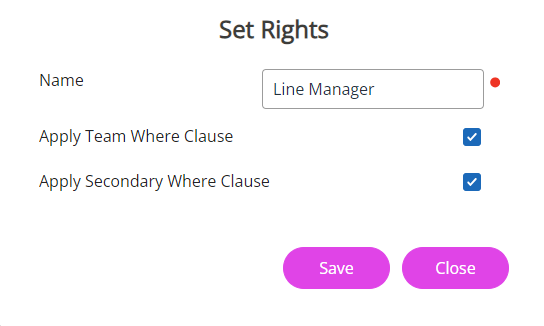
Enter a name for the new Set Rights role (for example, Line Manager).
-
Select the Apply Team Where Clause Allows you filter records using a specific criteria. and Apply Secondary Where Clause checkboxes to ensure any Where Clauses added to the role apply when assigned to employees.
If you select these checkboxes, any existing employee Where Clauses will be overwritten once you assign a role to them.
-
Select Save.
The new Set Rights role should display in the list.
-
Select the arrow beside the role entry and choose View.

The same Set Rights screen which displays when configuring Set Rights for an individual employee appears.
-
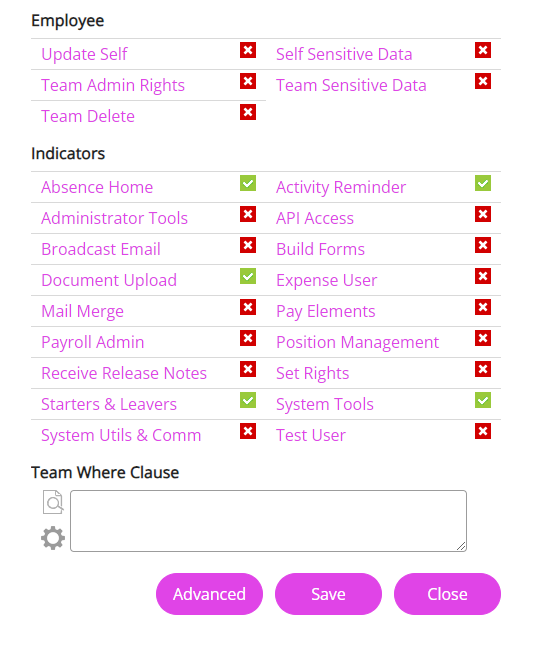
Select the options you want to enable for line managers. For example, if line managers need to:
-
Run reports on the employees who they have access to, select System Tools.
-
Use the bulk Document Upload tool, select Document Upload.
-
-
After selecting the relevant indicators, configuring line managers’ access to employees’ information is the next step, and you can do this by creating a Team Where Clause using the builder.
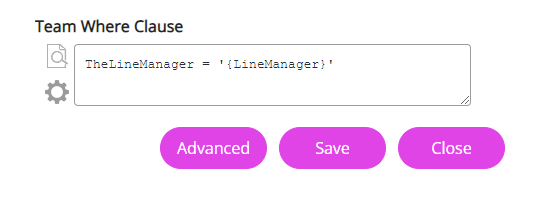
For example, to give line managers access to all employees for whom they are the line manager, you would need to create a Where Clause for TheLineManager = {LineManager}.
To do this:
-
Select the Where Clause Builder cog icon.

The Where Clause Builder opens.
-
From the Field list, select Contract – My Line Manager.
This relates to the line manager the employee has listed in their Contract tab in My Details.
-
Set Operator to Equal to.

We want to create a role which we can assign to all line managers, so do not enter a Value, as we need each line manager to see the direct reports for their respective team.
If you did select an option from the Value, for example, Victoria Abbey, this would mean that every other manager you assign to this role would have access permissions to view Victoria's team information, which we do not want to do, so instead, we are going to use the Follow option.
-
Select the Follow checkbox.
Selecting this checkbox means that when you assign this role to all line managers, the system sets their Team Where Clause as "TheLineManager = '{LineManager}'" and hypothetically inputs the manager's name in the second part of the clause, thus ensuring line managers only see the direct reports for employees in their team.

-
After selecting Follow, choose Set.
You can see the Team Where Clause has populated with the criteria added in the Builder.
-
Choose Save, reselect the dropdown arrow on the role > View.
The same Set Rights screen reopens.
-
At the bottom of the screen, select Advanced.
-
Under the employee's name, configure the information line managers can see in their My Details tabs.
To select or deselect the indicators in the table, you have a few options. You can choose the colour-coded tabs at the top of the screen, select the words to multi-select groups of indicators, or toggle each indicator to switch between deselected (cross) and selected (tick).
You can use the colour-coded tabs at the top of the screen or select the words to change the indicators from green to red, or vice versa.
Alternatively you can select each indicator individually.
-
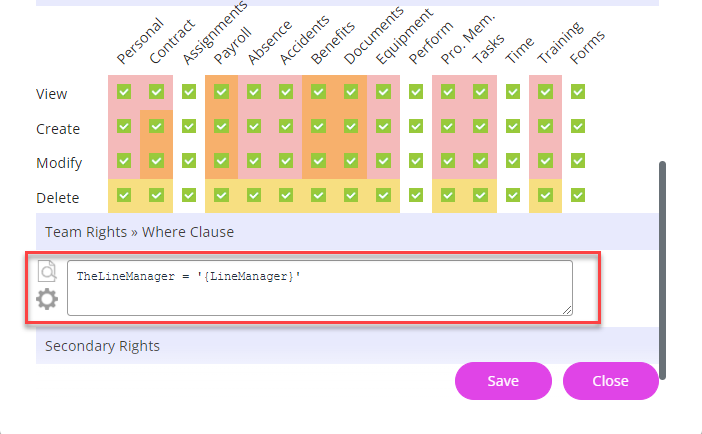
In the Team Rights section, configure line managers’ access to employees’ information in My Details.
View, permits line managers to see information on the tab in read-only format, Create and Modify allows managers to add and edit information, and Delete permits managers to delete information.
Note here that the Team Where Clause you added on the previous screen also displays in the Team Rights section of this screen in the Where Clause field. When you select the checkboxes under the Team Rights headings, you are defining the actions a line manager can perform in the My Details tabs for employees who report to them.
To ensure admins receive a notification if a line manager deletes a record from the employee's Personal, Contract or Payroll tabs, add a notification email. Refer to for guidance on how to set this up.
-
The Secondary Rights section allows you to configure any access line managers may need for employees other than direct reports.
For example, if line managers have health and safety responsibilities, you may give them access permissions to the Accidents tab for all employees.
To do this, select the View, Create, Modify and Delete indicators in the Accidents column, and add a Secondary Where Clause for 1=1, which shows that you want to include all active employees in the company.
1=1 is a technical term and means that the statement equals true.
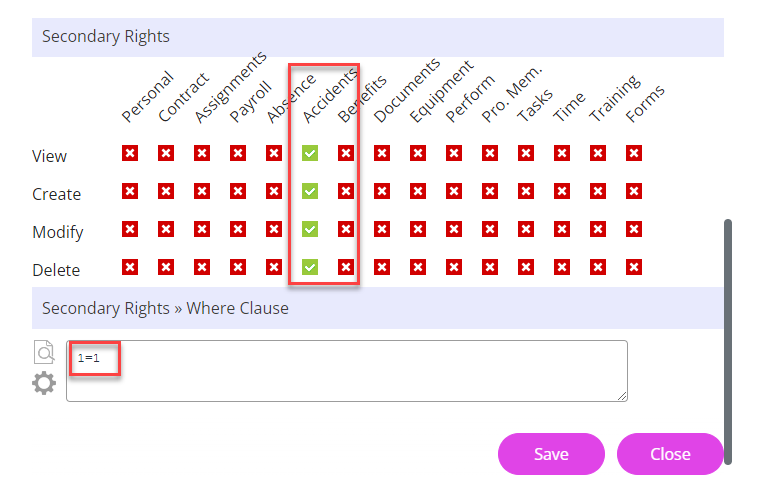
Team Rights overwrite Secondary Rights. Therefore, any indicator selected in Secondary Rights must also be selected in Team Rights.
So, if you give line managers access to employee accident records via Secondary Rights, you must also select View, Create, Modify and Delete on the Accidents column in Team Rights.
-
Select Save .
-
Choose Close on the main Set Rights screen.
You have successfully created your first Set Rights role and are ready to assign it to individuals or groups of employees using the Employee Selector. Refer to Assign Set Rights Roles for more information on applying roles.