Create a form/multi-step form
In your HR system, you can create a range of forms, such as pre-employment check forms, exit interview forms, and return-to-work sickness forms.
Before building a form, go to My Details > Forms to view a list of pre-built forms available in the system. This will give you an idea of what’s already available and help you decide what to create. The forms you can access depend on your package.
Build a form
The first step in creating a form involves specifying the form owner, setting its active duration, and determining who will have access to it.
-
Go to System Tools > Utilities > Apps > Other Forms.
-
Select Create New.
Choose the form owner
-
From the Owner dropdown, choose who should own the form.
Name the form
-
Enter a form Name. For example, Return to Work - Sickness.
Activate the form for a specific time period
-
To make the form active for a specified period of time, enter a Date From and Date To.
Do not enter a date if you want to make from active immediately.
Add notes on how to complete the form
-
Add notes to give employees information about the form. For example, include instructions on how to complete the form.
Remember, the employee can view the information added here.
Specify who can access the form
-
To only allow certain employees access to the form, create or enter a Where Clause.
Creating a clause means that only employees specified in the clause can access the form. Do not enter a clause if you want all employees to access the form.
Specify the number of times employees should complete the Form
-
In Max. Records, enter the number of times an employee needs to complete the form. For a single completion, add a 1.
If you want the form completing regularly, do not add a number.
Use tab permissions
-
The permissions set in an employee's Set Rights > Self Set Rights Set Rights are the system permissions you allocate to employees to control the information available to a user about other employees., Forms column determine their access permissions to a form.
However, you can override these with other tab permissions. For example, if you want it to be by request, then you may wish to use the permissions from the Absence When an employee or worker is absent from work. This can be for a variety of reasons. tab, provided it is set to by request.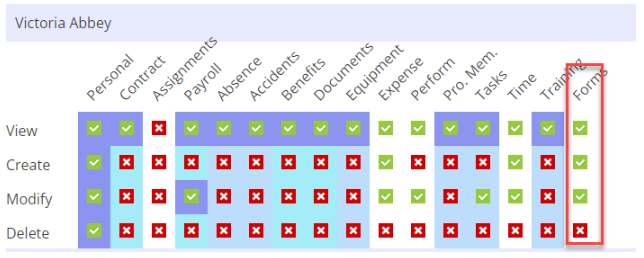
Request/approval
-
Select the Request/Approval checkbox to send the form through the request /approval process.For example, you may want line managers to be the first approvers and Human Resources to be the second.This can include multistage approvals.
You cannot select both the Request/Approval and Submission boxes.
Make the form submission only
-
Select the Submission checkbox to make the form submission only. For example, you may not need approval but require a submission email of entry.
Field not required for multi-step forms.
Add an email
-
Select the Email checkbox to notify Line Managers about the submission.
Field not required for multi-step forms.
Add a submission email address
-
If you have selected the Email checkbox and want to submit the form to someone other than the Line Manager, enter the relevant person's email address here.
If you select both the Submission and Email checkboxes, the system defaults to sending the submission email to the Line Manager.
Field not required for multi-step forms.Choose the tab to display the form
-
From the Display On dropdown, select the tab you want to display this form in.
For example, you may want to add a return-to -work form in the My Details > Absence tab. After you have created the form, employees can access it in the Absence tab using the Actions dropdown.
Choose to display the form in full screen
-
Select the Full Screen checkbox if you want to display the form as full-screen. If you leave the checkbox deselected, the form displays in a pop-up.Typically, users use full-screen forms for surveys or questionnaires and a display with a wider layout than the standard form size.
Make the form anonymous
-
Select the Anonymous checkbox if you want employees to complete the form anonymously.
Upload a document
-
Select the Document checkbox to upload a document alongside the form.
Activate the form
-
Select the Active checkbox to make the form active.
Save the form
-
Select Save to save the form.
The form you have created displays in the Other Forms list.

After completing the basic information for the form, you can start adding the contents of it.
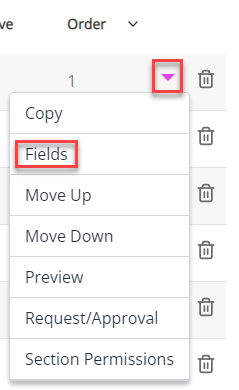
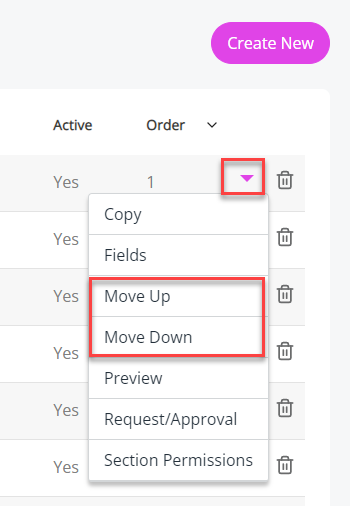
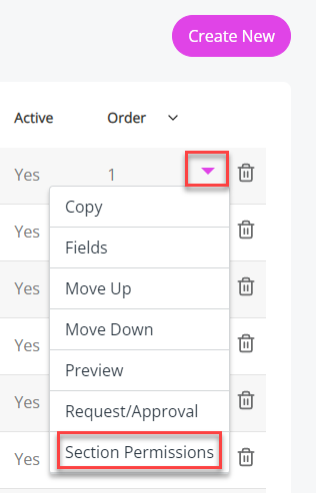
On the required form, select the arrow. From here, you can:
-
Copy a form.
-
Control the order of the forms listed within Utilities > Apps > Other Forms, List View and also the Forms tab in employees My Details by selecting the Move up/down arrow.
-
Preview a form as you go along.
-
If you have selected Create a form/multi-step formin the form's permissions, you can also set up the relevant stage approvals by selecting Request/Approval.
-
Selecting the bin icon next to the dropdown, deletes the form and any associated entries recorded against employees.
Add the form's contents
-
Go to System Tools > Utilities > Apps > Other Forms.
-
On the required form, select the dropdown arrow and choose Fields.
-
Select Create New.
This is where you populate the fields and questions for your form.
Add a form heading
-
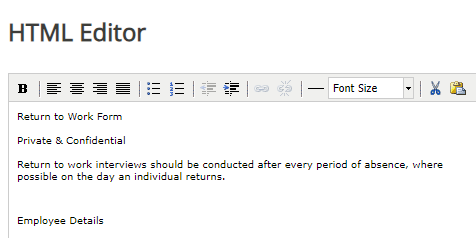
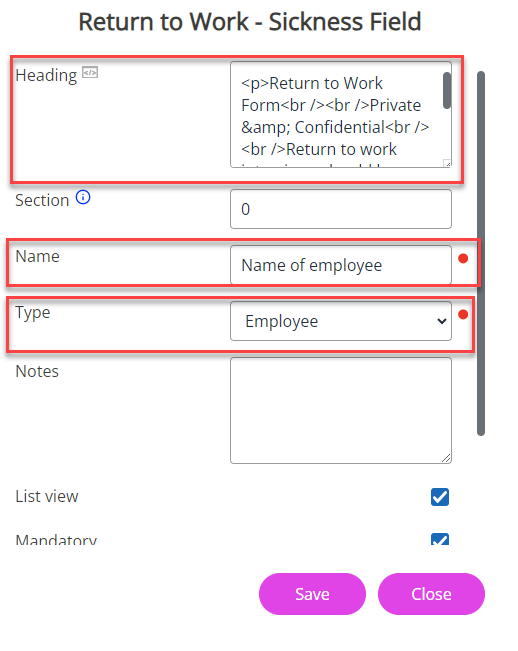
Select the HTML Editor icon and add a heading and brief description about the form's contents. You can also a the heading for the first section of your form too.
For example, you may enter:
Return to Work Form
Private & Confidential
Return to work interviews should be conducted after every period of absence, where possible on the day an individual returns.
Employee Details
Remember, on the Other Forms screen, you can select the dropdown arrow on the required form and select Preview to view it at any time in the creation process.
Add section information
-
Enter a number in the Section field if you want to separate the form into different parts and only allow employees to either view or edit the section.
So, if this is the first part of the form, you would enter the number 1, then when you create your Section Permissions, you can add this section number, the Request/Approval Stage, and assign Permissions to it.
For use with multi-step forms. Leave this checkbox deselected if you are not creating a multi-step form.
-
In Name, add a field description to display on the form. For example, you may add Name of employee.
Choose a Field Type
-
Select the field format using the Type dropdown.
The option you choose from the Type dropdown determines the field format so it is important to choose the correct one.
To help you choose the most appropriate Type, refer to these examples.
Field Type Description Currency Number field. You cannot enter any text into these fields. 
Date A date-picker.

Employee A dropdown displaying employee names.

Line Manager A dropdown displaying line manager names.

List A system list.
List Check Multiple choice checkboxes from a list.
List Radio Pick one choice radio button from a list

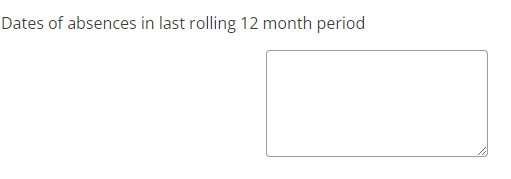
Memo Large text box.
Number Number field. You cannot enter any text into these fields.
Text Free text field (small)

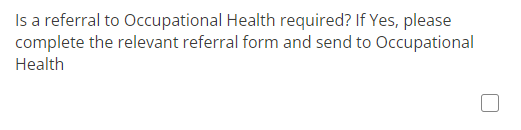
Time Saves in the format of time, so if you add the number 10, the system saves it as 10:00:00. Yes/No Select the checkbox for Yes. Default is No. You cannot make the Yes/No field mandatory as the only option is Yes. If you want to make a Yes/No question mandatory, use either a List or List Radio with Yes/No options. This allows the employee to either choose Yes or No.
Signature Allows the person completing the form to enter their name in the signature box.

Examples
Example 1
Here are some examples to help you choose the correct field Type:
-
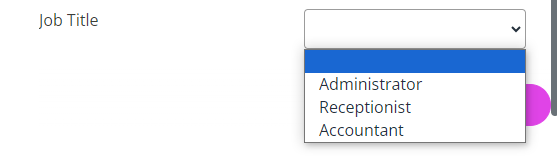
You want to add a Name of employee field which is in a dropdown format.
To do this, in Heading add Employee Details, in Name, add the field name (Name of employee), and from Type, choose Employee to create the field as a dropdown.
Example 2:
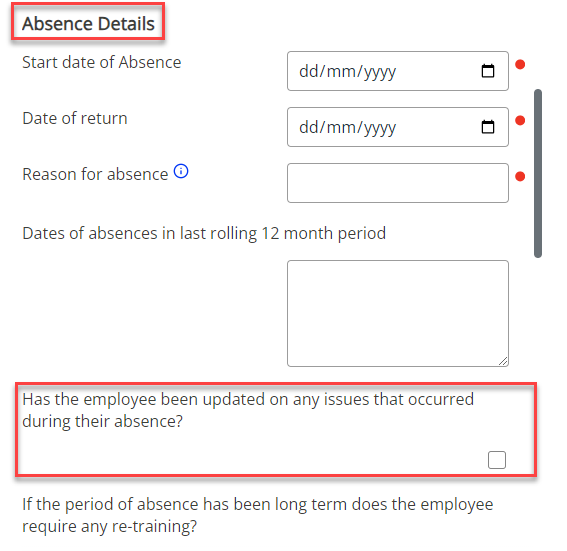
-
You want to ask a question with a checkbox for the user to select.
To do this, add a Heading such as Absence Details, in Name, add the question, for example, 'Has the employee been updated on any issues that occurred during their absence?', and in Type, select the Yes/No option.

Example 3
-
You want to add a field with a range of checkboxes for the user to choose from.
In this case, you would add a Heading, enter the field title in the Name option, and from the Type dropdown, choose List Check.

Enter Form Notes
-
Enter a Field Name
-
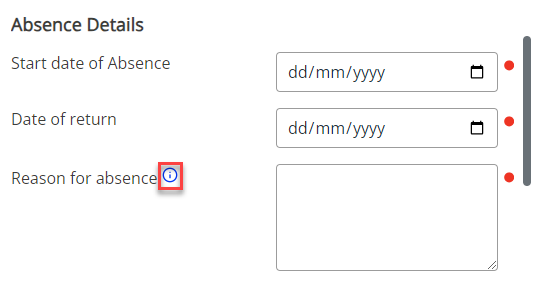
In Notes, add information to give the employee more context about the field.
For example, in a Return to Work form, you may add a Reason for Absence field and add a note to tell the person completing the form what information they need to enter.
An icon displays next to the field to indicate that there is more information about the field available.
List View
-
Select the List View checkbox if you want to display the content in list view when reviewing entries in the employee's Forms tab.
Mandatory
-
Select the Mandatory checkbox to make this field compulsory.
Reports
-
Select Reports if you want to report on the form in the future.
-
Choose an option from the Report Filter dropdown list. This relates to number or date fields only.
-
Select Save.
-
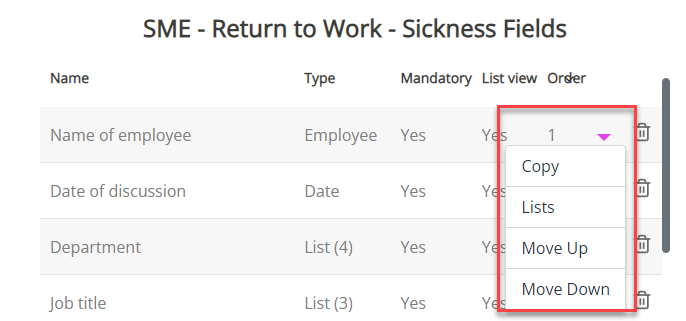
The Fields table updates with all the fields you have added to the form.
You can select the dropdown arrow displayed on each field name to copy the field, rearrange it in the list by moving it up or down, or adding a list of options to the field.
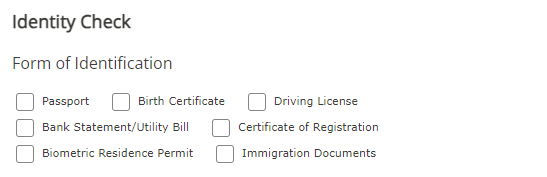
Create a Field List
If you have chosen List, List Check or List Radio for your field type, you need to populate the options for these lists. Employee and Line Manager field types are auto-populated.
-
Go to System Tools > Utilities > Apps > Other Forms.
-
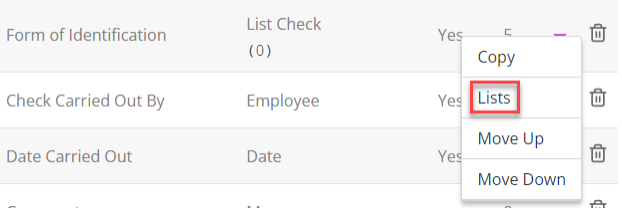
Locate the required form and select the dropdown arrow > Fields.
The Fields checklist screen opens.
-
Locate the field you want to add a list to and select the dropdown arrow > Lists.
Add a Field List
-
Select Create New.
-
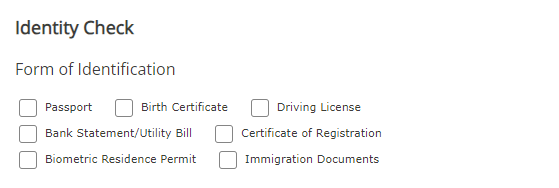
Enter a name. For example, Birth Certificate.
-
Select Save.
-
Repeat the same steps for all the options you want to add to the field.
Reorder Lists
-
After adding all the list options, you can reorder them using the up/down arrows, deactivate them using the tick icon, and delete them.
Check a Field's List
-
To check the field has populated with the correct list options:
-
Return to the Other Forms screen.
-
Locate the required form.
-
Select the dropdown arrow > Preview.
The form displays showing the field with the list of options you have added.
-
Preview a Form
To view the form during the creation process:
-
Go to System Tools > Utilities > Apps > Other Forms.
The Other Forms screen displays showing the forms created.
-
Locate the form you want to preview from the list.
-
On the form, select the dropdown arrow > Preview.

-
The form displays.
Rearrange a Form in the Other Forms list
To rearrange forms in the list:
-
Go to System Tools > Utilities > Apps > Other Forms.
The Other Forms screen displays showing the forms created.
-
Locate the form you want rearrange in the list.
-
Select the dropdown arrow displayed on the form and choose either Move up or Move down.
Set up a Request/Approval Route
To set up the request/approval route for a form:
-
Go to System Tools > Utilities > Apps > Other Forms.
The Other Forms screen displays showing the forms created.
-
Locate the form you want to set the request/approval route for.
-
Select the dropdown arrow displayed on the form and choose Request/Approval.

Make sure to select the Request/Approval checkbox in the form's details; otherwise the system will not allow you update the approval route.
-
Select Create New.
-
Select Line Manager or choose the Employee from the list to give them approval rights for the Request/Approval.
-
If you have created a (Custom) Lookup field in the Screen Builder (for example, Line Manager), enter this into the Custom Employee field.
-
If the authoriser in the Request/Approval process is external, enter their email in External Email.
-
Approver Where Clause Allows you filter records using a specific criteria. – The multi-stage approval only applies when identifying the approver in the Where Clause.
-
Employee Where Clause - The multi-stage approval only applies when identifying the employee in the Where Clause.
-
Make sure to enter a number in the Stage to indicate where the employee is in the approval process.
For example, enter 1, if they are first in the approval or 2 if they are second in the process.
If using the Request/Approval options, you must set up Stage 1 as a minimum.
-
If required, select CC Manager on Approval to ensure line managers receive a notification when an employee approves a request.
-
Select Internal if you do not want to include an approval link in the email sent to the authoriser.
-
The authoriser must Sign in to the system to authorise or reject the request when selecting the Internal option.
-
Leave the Internal field deselected if you want to include the option to approve/reject the request in the email.
-
Select Save.
-
The Request/Approval form updates with the approver information you have added.
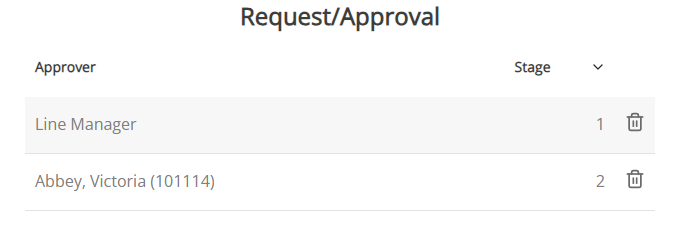
After adding the approvers you can add the Stage they are in the Request/Approval route when setting the form's Section Permissions.
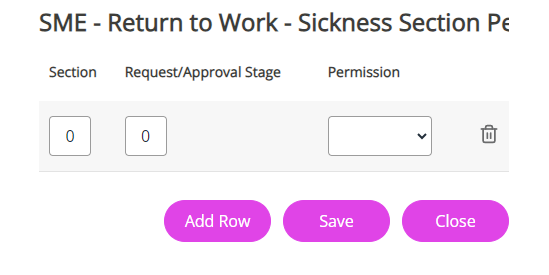
Set up Section Permissions
-
Go to System Tools > Utilities > Apps > Other Forms.
The Other Forms screen displays, showing the forms created.
-
Locate the form you want to set up section permissions for.
-
Select the dropdown arrow displayed on the form and choose Section Permissions.
-
A pop-up displays showing Section, Request/Approval Stage, and Permission columns.
-
Section relates to each part of the form. For example, you may have a section 1 and a section 2.
-
Request/Approval Stage relates to the approvers you have added in the Request/Approval screen and indicates their position in the approval process.
-
Permission gives the user access to either Edit or Read a section of a form.
If necessary, prior to adding the Section Permissions for users of the form, follow this example to understand the process.
-
-
In Section, enter the number 1.
This represents the first section of your form.
-
In Request/Approval Stage, always put 0 in your first section permission as this is the first employee receiving the form.
The numbers you enter after this relate to the Request/Approval stages already created.
You must add access permissions for each section of your form for both the requester and approver.
-
In Permissions, choose Edit to allow the user to add to the form or Read Only to only allow the user to view the form data.
-
Select Add Row at the bottom of the screen to add more permissions.
-
Select Save once you have created all permissions.
Example Section Permissions
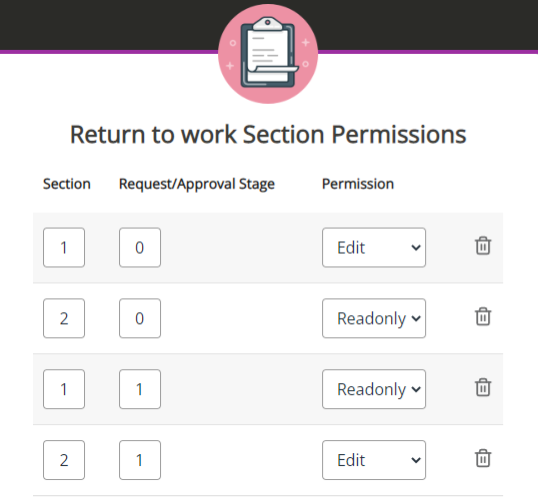
If you were setting the permissions for a form and you wanted employees to edit section 1, but only give them read-only access to section 2 of a form, you would:
-
In Section, enter the number 1.
-
In Request/Approval Stage, enter the number 0.
-
A multi-stage approval form should always be started by the employee, not the line manager which is why you should always start the request/approval with a 0.
-
-
From Permission, choose Edit.
-
Add another row by selecting Add Row.
-
In Section, enter the number 2. This relates to the second section of the form.
-
In Request/Approval Stage, enter the number 0, as this represents the first person to receive the form.
-
From Permission, select Read Only. This gives the employee access to only read this section of the form.
If you wanted the first stage approver to have read-only access to section 1 of the form, but edit permissions for section 2, you would:
-
In Section, enter the number 1.
-
In Request/Approval Stage, enter the number 1 as this is the first approver.
-
From Permission, choose Read Only.
-
Add another row by selecting Add Row.
-
In Section, enter the number 2.
-
In Request/Approval Stage, enter the number 1 as this is the first approver.
-
From Permission, choose Edit.
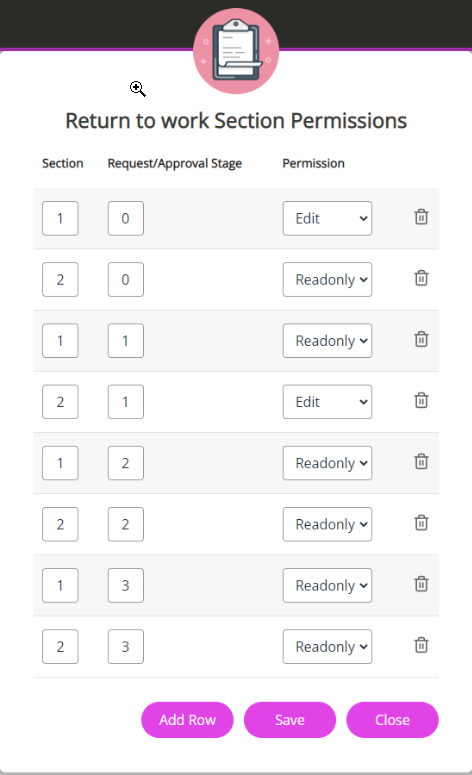
If you had a second and third stage approver and wanted to give them read-only access to the first section of the form, you would do:
-
Add another row by selecting Add Row.
-
In Section, enter the number 1.
-
In Request/Approval Stage, enter the number 2, as this indicates the second approver.
-
From Permission, choose Read Only.
-
Add another row by selecting Add Row.
-
In Section, enter the number 2.
-
In Request/Approval Stage, enter the number 2, as this indicates the second approver.
-
From Permission, choose Read Only.
-
Add another row by selecting Add Row.
-
In Section, enter the number 1.
-
In Request/Approval Stage, enter the number 3, as this indicates the third approver.
-
From Permission, choose Read Only.
-
Add another row by selecting Add Row.
-
In Section, enter the number 2.
-
In Request/Approval Stage, enter the number 3, as this indicates the third approver.
-
From Permission, choose Read Only.
-