Upload a document
Need to upload an employee photo? Refer to Upload an employee photo.
To upload a document for an employee:
-
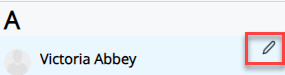
Go to Directories, select the employee and choose Edit.
You can also select the edit icon displayed on the employee's name.
-
Select Documents.
-
At the top right-hand of the screen, select Create New.
The Documents screen opens.

-
From the Description dropdown, select the appropriate option.
Select the word Description to add new dropdown options.
-
Add any Notes you want to display about the document.
-
If required enter a Review and Publish Date for the document.
If you do not add a Publish Date, the document becomes available to view immediately.
-
Select Add Document.
-
To make the document Read & Accept, select the Read & Accept checkbox.
If you select the Read & Accept checkbox, 3 additional fields display:
-
Select Notify Employee to send the employee a message about the document.
-
Add a document Title.
-
Add a Query Email the employee can use to ask for more details about the document.
Sensitivity
-
-
If you marked the document as Sensitive when creating the lookup (description), the Sensitive Record checkbox will automatically be selected, and you can specify who can view the record.
If you did not mark the document as Sensitive and you want to restrict who can view it, select Sensitive Record and choose who can access the document.
If you leave the Sensitive Record checkbox deselected, anyone with access to the employee's details can view the document.
-
Admin sets automatically when selecting Sensitive Record.
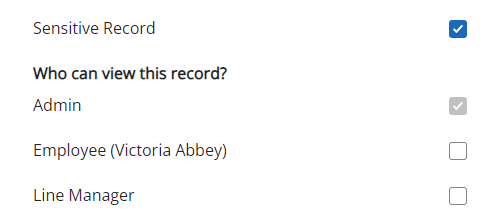
Who can view this record?
-
Select Employee to allow the employee to read and accept the document.
-
Select Line Manager to give the employee's line manager permission to view the document.
-
-
Select Save.
-
Select Choose file and select the required file.
-
Choose Upload.

The uploaded file displays in the Documents tab.
Alternative upload method
-
Alternatively, select Upload to drag-and-drop the file. You can drag-and-drop multiple files.
-
Select the link to continue.

-
Select the appropriate label from the Description dropdown for each document and Save.