Create and submit a time request
-
Sign in to Staffology HR.
-
Select My Details from the left navigation menu.
-
Select the Time tab.
-
If required, use the Default Time Type dropdown to choose the type of time request you are submitting, for example, overtime.

Choose Static or Flexible Dates
-
Select either Static or Flexible Dates at the top right of the screen.
When to use Static Dates
-
Single request: use Static Dates to submit a single time request for the same day.
-
Multiple requests (same day): use Static Dates to submit multiple time requests for the same day.
Static Dates is set as the default. When the option to select Flexible Dates is available, the system is currently set to Static Dates.
Do not select Flexible Dates if you need to submit one or more requests for the same day. Instead proceed to Add the details of your time request.
When to use Flexible Dates
-
Multiple dates: use for entries spanning multiple dates.
-
Select Flexible Dates to set this option and add a time request which spans multiple dates.
-
To switch back to Static Dates, select Static Dates.
-
Proceed to Add the details of your time request.

Add the details of your time request
-
-
Complete all sections listed in this table:
Field Description Type Select from the list of time request types, for example, overtime.
From Defaults to today's date. Change this if required.
In the field to the right of the calendar control, enter the start time for this request in the HH format,for example, 17:30.
To Enter the completion time in HH (e.g., 21:30).Flexible DatesIf you are adding a Flexible Date request, another date field displays. Add the date the request ended. Also, add the end time.Break If you had a break within the start and end time period, enter the start time of the break.To Enter the break end time.The duration of the break deducts from the total hours for this request.Notes Select Add to include a note alongside your request.

-
Choose your next step based on the type of request:
-
Static - single entries: select Save and proceed to Attach supporting documents or Submit time requests.
-
Static - multiple entries (same day): Choose Add Time to add more rows, then select Save and proceed to Attach supporting documents or Submit time requests.

-
Flexible Dates: for entries spanning multiple dates, select Save and proceed to Attach supporting documents or Submit time requests.

After saving, the system calculates the total hours worked, deducting any break time.
Attach supporting documents (optional)
Attaching a document is optional. If you do not need to attach any documents, proceed to submit your requests.
-
-
In the Document section of the request, select Attach.

-
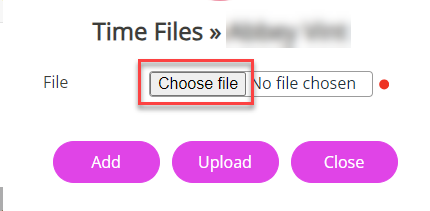
On the Time Files screen, select Create New.
-
Select Choose file, browse to your document and select it.
-
Choose Add to include another document or Upload when complete.
-
Select Close.
A paperclip icon indicates that you have uploaded a file. Repeat this for each request that requires documentation.
You can now submit your requests.
Submit a time request
-
In the Time Recorded section, select the tick icon next to each request.
-
To select multiple entries, choose Select All.

-
-
Select Submit.
You have successfully submitted your time requests for approval.
-
Once submitted, an email sends to your line manager/approver who can either accept or decline your submitted requests. You also receive an email notification once your requests are processed.
-
The Time Submitted section updates showing the requests you have added and the status of them.
Check a time request status or send re-request (optional)
To check the status of a request, or send a re-request:
-
In the Time Submitted section, select the Status dropdown and choose Pending, Approved, Declined, or leave blank to view all submitted requests.

-
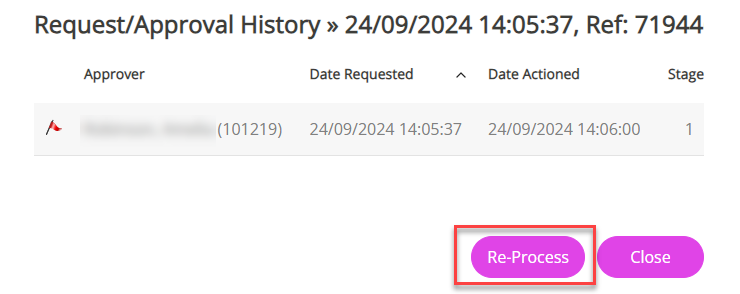
On the required request, select the History option to view the approval history, including:
-
Approver’s name
-
Date requested
-
Date Actioned
-
Stage (if your organisation uses multi-stage approval)
A coloured flag that indicates the batch status:
Colour Status Yellow Pending Black Cancelled Green Approved Red Declined -
-
To re-process a declined request, select Re-Process.
-
To re-request a pending request, select the arrow shown in the Re-request column.

-